Simple Sourdough Starter
How to make your own Sourdough Starter, using simple ingredients with no special equipment, in 5-8 days, that can be used in sourdough bread, pizza dough, waffles, scones, pancakes, and rolls- instead of using yeast. Sourdough Starter is a wild yeast, made from flour and water and the wild yeast in the flour itself and from the air around us. UPDATED 4/16/2020
- Prep Time: 30
- Cook Time: 6 days
- Total Time: 144 hours 30 minutes
- Yield: 1 ½ cups 1x
- Category: fermented, cultured, bread, baking,
- Method: fermented
- Cuisine: global
- Diet: Vegan
Scale
Ingredients
- 120 grams wholegrain flour (whole wheat flour, rye, or freshy milled flour) 1 slightly heaping cup.
- 5 lb bag white bread flour (organic works best)
- 1/2 cup Filtered Water (or bottled) per feeding
Instructions
-
- Day 1: Staring in the morning or at night, using a wide-mouth 4-cup mason jar or Crock or Glass Measuring Cup (use glass, ceramic or stoneware) mix 1 heaping cup whole wheat flour (120 grams) with 1/2 cup (120 grams) filtered water (room temp or lukewarm) using a fork (or chopstick) making sure you’ve incorporated all the dry flour. For your first measuring – is a good idea to weigh it using a kitchen scale so you get an idea of how thick it should feel. It should be like a thick paste. Thick like peanut butter! If you need to add a little more water to incorporate the flour, that is OK. Place the lid on top (using the Weck jar is really handy here) or a damp towel to keep moisture in, or plastic wrap- and let sit at room temperature (70-80 degrees) on the kitchen counter for 24-36 hours. If you are not sure how warm it is, use a kitchen thermometer and check it a few hours later. See notes for TEMPERATURE.
- Day 2: After the first 24 hours, you may no activity, or you might see a bit of bubbling. I prefer to let this rest until I see a tiny bit of activity (bubbles) and sometimes this takes 36 hours. Either way, EITHER AT 24 HOURS OR UP TO 36 HOURS, discard HALF of the starter (keeping roughly ½-cup of starter in the jar). Add to the remainder, 1 heaping cup of white bread flour, (120 grams) and 1/2 cup filtered water (120 grams), mixing well with a fork. Plac the lid on again and allow the mixture to sit at room temperature (70-80F) for another 24 hours.
- Day 3: By the third day, you’ll see some bubbling and evidence of expansion. It’s now time to begin two feedings a day, as evenly spaced as your schedule allows (like 8 am and 8 pm). For each feeding, discard all but 1/2 cup of the STARTER. Add 1 heaping cup Organic Bread Flour and 1/2 cup water to the 1/2 cup starter. Mix the starter, flour, and water, cover, and let this rest at room temperature for 12 hours before repeating. (In a nutshell, you want to feed the starter after it has peaked and has even perhaps started sinking down- this is when it is hungry!) This might be 12 hours, it might be 14-16, it might be 10 hours, depending on the temp in your house.
- Day 4: Feed again, 2 times, roughly 12 hours apart, discarding all but 1/2 cup of starter EACH TIME. 1 heaping cup bread flour, 1/2 cup water. Hopefully you’ll start to see a more predictable rising and falling. It is OK if it doesn’t double. If you are not seeing much activity, check it’s temp using a kitchen thermometer. Remember best temp is 70-80 degrees. Find a warm spot, not in direct sun. ***If for some reason your starter looks like it is still rising at the time of second feeding (at night) and there is no evidence it has fallen or no slide marks, you could skip this feeding and feed first thing in the morning. Feeding it when it is “not hungry” will basically dilute all the growing yeast. See notes on Overfeeding.
- Day 5: Feed again, 2 times, roughly 12 hours apart, discarding all but a half cup the starter EACH TIME. 1 heaping cup bread flour, 1/2 cup water. The starter should look visibly active, bubbling, rising, expanding, getting pretty close to doubling.
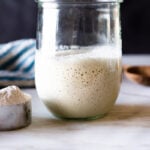
- DAY 6: Give it one last feeding. Discard all but a 1/2 cup. Add 1 heaping cup flour (120 grams) and 1/2 cup water, and place it in a clean jar so you can see the action clearly. You can use a sharpie or place a rubber band around the jar to mark the beginning level. The starter should hopefully double in volume within 4-6 hours of feeding. Let the starter rest at room temperature for 6-8 hours; it should be active, with bubbles through out or breaking the surface. Then DO THE FLOAT TEST: To test the starter, place a teaspoon of starter in a glass full of water, it should hopefully float. If it does, you can make bread. Tonight! At this point, if your starter does not double in size or does not pass the float test, don’t give up! Sometimes it just takes longer. Continue feeding two times a day, for a few more days, until you see a consistent, predictable, rise and fall, and it floats. Read troubleshooting section. If you need to take a break, don’t dump it! Put it in the fridge and try it again up to a week later. (Seriously don’t toss it- if you’ve seen any bubbles at all, it is truly alive, just needs some love!)
- Day 6 EVENING: Use 1/3 cup starter to make bread (if you want) and transfer the remaining starter (or all of it) it to its permanent home: a sterile crock, mason jar, or whatever you’d like to store it in long-term. Store the starter in the refrigerator, and feed it at least once a week, reserving ⅓ to ½ cup starter, before feeding it the usual 1 cup bread flour, 1/2 cup water.
TROUBLESHOOTING:
- SMELL: Starter should smell sweet and tangy, and not “bad”. If it really smells unpleasant, you may have used an unclean jar, or somehow introduced other bad bacteria. I would start over.
- NO ACTION: If your starter was doing great, then fizzled out, try using a little whole grain flour mixed with the bread flour into the feedings and really monitor amounts, making sure you are feeding the 1/2 cup starter a full heaping cup of flour (120 grams). Check the temp (using a thermometer) and give it a little extra time to “digest” the flour. Sometimes it takes longer than 12 hours. It is OK to skip a feeding at night if it looks like it is still peaking or rising.
- DO NOT overfeed. For example, maybe, feeding 2 x day at 12-hour intervals is too often. You want to feed after the starter has peaked, then deflated a little (see photo above- you’ll see some slide marks on the jar) and this tells you that it is hungry. If you feed the starter before it has had a chance to metabolize (or eat) all the flour (before peaking) and then you discard part, and feed it again, you are actually diluting all that amazing bacteria. Get it? So it’s all about watching your starter in your home. There are lots of variables here. Just be patient, pay attention and watch. This is a living thing- it doesn’t care about time schedules and recipes or what it “should” do. It will “eat” when it is “hungry” and sometimes it likes to eat slowly!
- It may take longer than 6 days in colder environments. Use a kitchen thermometer and take its temp. Is it over 65F? Find a place where it can be warm. Not in direct sun. Sometimes it takes 10-12 days. Be patient, keep going. If it is doing absolutly nothing, leave it out on the counter for 24-48 hours and see what happens. If you run out of flour or need a break, don’t just toss it, put it in the fridge and see if you can get it going a few days later.
- ACIDITY: If you still can’t get that starter going, some people recommend subbing pineapple juice for the water for one feeding- raising the acidity level. My good friend just tried this and it got hers going!
- LIQUID: If you see any liquid at the top of your starter, it means your starter is hungry! So, yes it’s still alive which is a good thing! You can stir the liquid in, or pour the liquid out, either way, but feed it! This may be a sign that you may need to feed it more often than every 12 hours.
- MOLD: if you see any discoloring or mold on the surface, starter was probably contaminated. If it is only on the surface, it is probably worth saving. Scrape it off, save 1/2 cup of the underneath starter, and keep going. Feed, smell, use your best judgment.
HOW TO MAINTAIN YOUR STARTER:
- REFRIGERATE & FEED AT LEAST ONCE A WEEK: Pick a scheduled day and try to stick with it, always reserving 1/2 cup and feeding it 1 cup flour and 1/2 cup water. If you forget to feed it one week, it is likely ok, just feed it 2 x day for 1-2 days in a row to revive it (keeping it out on the counter) until bubbly and active. I’ve left my starter for a month on vacation (in the fridge) without feeding and simply revived it by feeding it 3 days in a row, 2 x day. It’s actually kind of hard to kill. You can also freeze it for longer storage. If you want to bake often, like every day, best to keep it out and keep feeding 2 x day.
Notes
- TEMPERATURE: The colder your home, the longer it will take for the starter to grow and become active (bubbles). Find a warm spot (70-80 degrees) for the best results. On the stovetop, with the light turned on, or on top of the fridge. Or in the oven with the light on. On top of a heating pad (set to low) with a towel in between). You can still make the starter in a colder home, it will just take longer- even up to 2 weeks!
- FLOUR: Always try to start the batch by using organic whole-grain flour (wheat or rye) because it has more wild yeast in it than white flour and will get it active and growing sooner. You can, of course, continue to use whole grain, but I’ve had the best luck using organic white “bread” flour for days 2 through 6. People have made starter with AP flour- but personally this has never worked for me.
- WATER: Using filtered or bottled water seems to have the best results. Sometimes chlorine in tap water can inhibit the growth of your starter. If you don’t have an option- some people leave the tap water out, in an open container overnight to allow some of the chlorine to evaporate. I have not personally tried this. Using room temperature water or lukewarm water helps fermentation to start faster.
- HYDRATION: Hydration refers to the ratio of water to flour in terms of weight. It is a ratio. Starter is typically at 100% hydration- meaning equal parts flour and water, in terms of weight. So if you use 120 grams of water, use 120 grams of flour. This roughly translates to 1 cup of flour and 1/2 cup water. Feel free to weigh instead of measure if you want to be more precise, or want to familiarize yourself with the consistency you are aiming for.
- STORING AND FEEDING: When your starter is kept cold, like in the fridge, you don’t need to feed it as often- only once a week. If you keep it out on the counter, you’ll need to feed it 2 x daily, Cold slows down the fermentation, heat speeds it up.
- USING: When you need to use your starter for baking bread, feed it 3-6 hours before making bread dough, using it right at peak height or slightly after (even better).
- Do I REALLY have to discard my starter? YES. I know it seems wasteful- but while you are building your starter, during the first week, it is the simpliest, easiest, fastest and most economical way to create healthy a starter. This is because you always have to feed it 2 times its volume!!! Fro example-if you kept all the 1 1/2 cups of starter, you would have to feed it 3 cups (instead of keeping jut a 1/2 cup and only feeding it ONE cup). Get it? 😉 Doing this will shorten the fermentation process, require less flour in the long run, and create a stronger starter. Once starter is “established” after the first week- then you don’t need to toss it but can use it (in pizza dough, waffles, etc) or give it to a friend.